The OFFSET function in Excel is a versatile and powerful tool, especially when you’re working with dynamic data ranges. In this blog post, we’ll take a deep dive into how the OFFSET Function in Excel works, and by the end, you’ll feel confident in using it to retrieve data efficiently in your own projects.
We’ll walk you through a real example with data for Product Names, Dates, and Amounts, and show you how to fetch specific records dynamically with the OFFSET function.
What Is the OFFSET Function in Excel?
Before we jump into the examples, let’s first get a basic understanding of what the OFFSET function does. The OFFSET function returns a cell or range of cells that is a specified number of rows and columns away from a starting cell or range.
In simpler terms, if you have a starting point, you can tell Excel to “offset” by a certain number of rows and columns and pull the data from there. This is especially useful when your data is constantly being updated, and you want Excel to retrieve the most recent entry or a dynamically shifting range.
OFFSET Function Syntax
Here’s what the OFFSET function looks like:
=OFFSET (reference, rows, cols, [height], [width])
- Reference: This is your starting cell.
- Rows: The number of rows you want to move away from the starting cell.
- Cols: The number of columns you want to move away.
- Height (optional): The number of rows to include in the returned range.
- Width (optional): The number of columns to include in the returned range.
Now that we’ve covered the syntax, let’s jump into a practical example!
Example: Using OFFSET to Retrieve the Last Record
The data continues down for multiple rows, but for the purpose of this blog, we’ll keep it short. What we want to do here is retrieve the last record from this dataset dynamically, meaning as more products are added, we can always fetch the most recent entry.

Formula to Retrieve the Last Entry
Here’s the formula we’ll use with the OFFSET function:
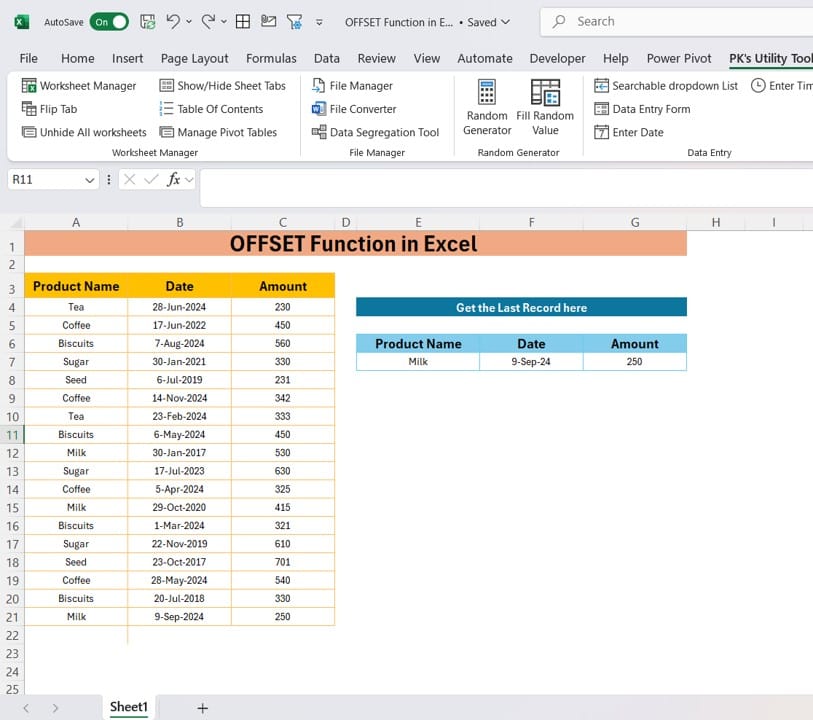
=OFFSET (A3, COUNTA (A4:A2099),0)
Let’s break down how this formula works:
- A3 is our starting reference point, which is the first product name.
- COUNTA(A4) counts the number of non-empty cells in the column. This helps us determine how far to “offset” to get to the last record.
- The 0 indicates that we’re not shifting any columns from the starting point.
When you apply this formula, Excel will give you the most recent product, which in this case is “Milk” with a date of 9-Sep-2024 and an amount of 250.
The beauty of using the OFFSET function in this way is that as your data grows, you won’t need to manually adjust any formulas. The OFFSET Function in Excel will always fetch the last row for you automatically.
Practical Uses of OFFSET in Excel
Now that you’ve seen how OFFSET Function in Excel can help retrieve the latest record, let’s look at a few more scenarios where this function can come in handy:
- Dynamic Data Ranges: Use OFFSET to define dynamic ranges in charts or pivot tables, ensuring that your visuals update automatically as new data is added.
- Moving Averages: Combine OFFSET with functions like AVERAGE to calculate moving averages based on dynamic ranges.
- Fetching Data Based on Conditions: You can even combine OFFSET with IF statements to retrieve data based on specific conditions.
Final Thoughts
The OFFSET function in Excel is a fantastic tool when you need flexibility in handling dynamic data. Whether you’re working with a growing dataset, creating interactive dashboards, or building financial models, mastering the OFFSET function will help you manage your data more efficiently.
Feel free to try it out in your own spreadsheets and see how it simplifies your work!
Visit our YouTube channel to learn step-by-step video tutorials
View this post on Instagram