Employee onboarding is a crucial process for every organization. A well-structured onboarding process helps new hires integrate seamlessly into the company, ensuring they become productive members of the team quickly. One of the best ways to streamline this process is by using an Employee Onboarding Planner Checklist in Excel.
This article will walk you through how to create an Employee Onboarding Planner Checklist in Excel, its key features, best practices, and advantages. We will also cover some frequently asked questions to ensure you get the most out of this template.
Click to Employee Onboarding Planner
Why Use an Employee Onboarding Planner Checklist in Excel?
Using an Excel-based onboarding planner checklist offers several benefits:
- Centralized Information: Keep all onboarding tasks, responsibilities, and deadlines in one place.
- Easy to Track: Monitor the progress of onboarding activities using a structured table.
- Automated Progress Monitoring: Utilize built-in progress bars to track task completion.
- Customizable: Adapt the template based on organizational needs.
- Cost-Effective: No need for expensive onboarding software; Excel provides a free and powerful alternative.
Key Features of the Employee Onboarding Planner Checklist
Our Employee Onboarding Planner Template consists of two worksheets that help manage onboarding tasks effectively.
Employee Onboarding Planner Checklist Sheet
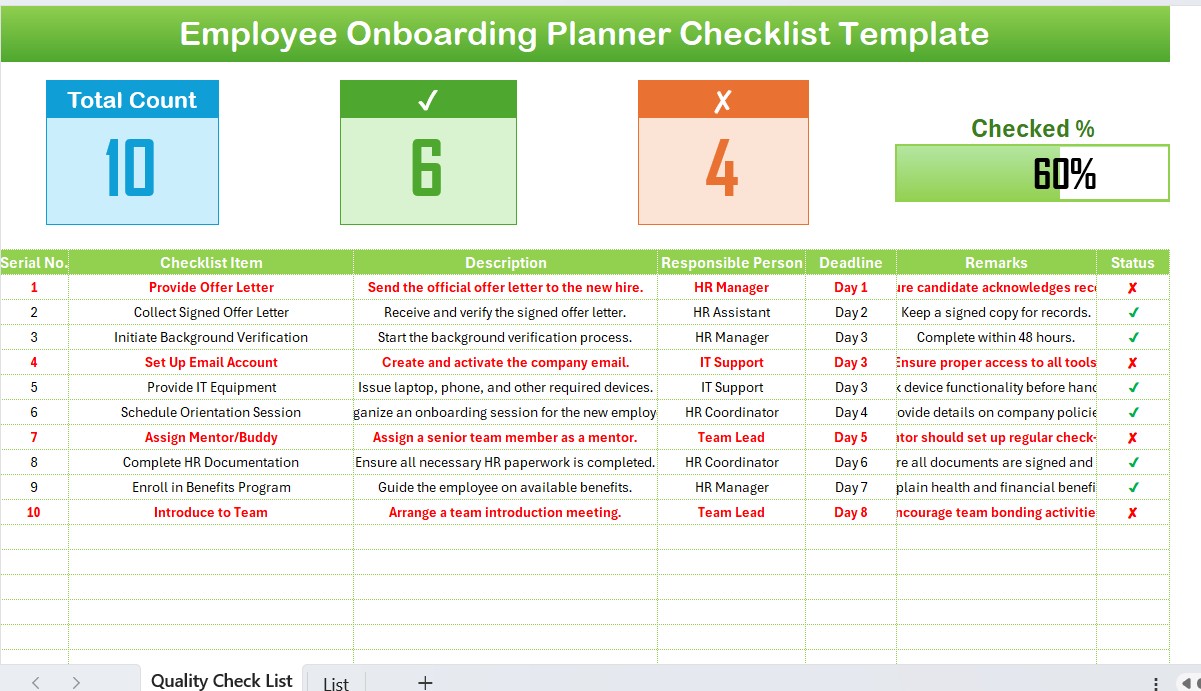
This is the main worksheet where onboarding activities are recorded and tracked. It consists of the following sections:
Top Section: Summary Dashboard
At the top of the sheet, we have three cards displaying key metrics:
- Total Count – The total number of checklist items.
- Checked Count – The number of completed tasks.
- Crossed Count – The number of incomplete tasks.
- Progress Bar – A visual representation of the onboarding completion percentage.
Click to Employee Onboarding Planner
Checklist Table
The checklist table is the core component where all onboarding tasks are listed. The table includes the following columns:
- Serial No. – Unique identifier for each task.
- Checklist Item – The name of the onboarding task.
- Description – A brief explanation of the task.
- Responsible Person – The team member responsible for completing the task.
- Deadline – The date by which the task should be completed.
- Remarks – Any additional notes or instructions.
- Status – Indicates whether the task is completed (✔) or pending (✘).
List Sheet Tab
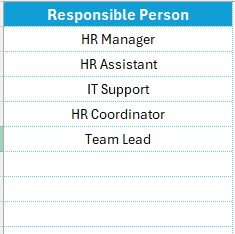
This secondary worksheet stores a unique list of Responsible Persons for creating a drop-down list in the main checklist table. This feature ensures that responsible persons can be selected efficiently without manual data entry errors.
Advantages of Using an Employee Onboarding Checklist in Excel
- Improves Efficiency – Ensures that no step in the onboarding process is missed.
- Enhances Accountability – Assigns clear responsibility for each onboarding task.
- Saves Time – Reduces manual follow-ups by providing a structured checklist.
- Customizable & Scalable – Adapt the checklist as per the organization’s needs.
- Real-Time Tracking – Allows HR teams to monitor onboarding progress easily.
Click to Employee Onboarding Planner
Best Practices for Using an Employee Onboarding Planner Checklist
To maximize the benefits of your onboarding planner checklist, follow these best practices:
Customize the Checklist for Your Organization
- Add or remove checklist items based on company policies.
- Define clear descriptions for each item.
Assign Responsibilities Clearly
- Use the Responsible Person column to delegate tasks effectively.
- Ensure that every task has a deadline and accountability.
Update the Checklist Regularly
- Review and update onboarding tasks based on feedback from new hires.
- Make improvements to ensure a seamless onboarding experience.
Track Progress Efficiently
- Use the built-in progress bar to monitor overall onboarding status.
- Ensure that all pending tasks are addressed before the deadline.
Automate Where Possible
- Use Excel formulas or conditional formatting to highlight overdue tasks.
- Enable drop-down lists to standardize inputs and minimize errors.
How to Create an Employee Onboarding Checklist in Excel
Step 1: Create the Main Table
Open Excel and create a structured table with the following column headers:
- Serial No.
- Checklist Item
- Description
- Responsible Person
- Deadline
- Remarks
- Status
Step 2: Add a Drop-Down List for Responsible Person
- Go to the List Sheet Tab and enter the names of all possible responsible persons.
- Use the Data Validation feature in Excel to create a drop-down list.
Step 3: Insert a Progress Bar
- Use COUNTIF formula to calculate the percentage of completed tasks.
- Create a Conditional Formatting Data Bar to visualize progress.
Step 4: Format the Status Column
- Use symbols (✔ for complete, ✘ for incomplete) to track progress.
- Apply Conditional Formatting to highlight pending tasks in red.
Step 5: Save and Share
- Save the file as an Excel Template (.xltx) to reuse for each new hire.
- Share it with HR and relevant departments.
Click to Employee Onboarding Planner
Frequently Asked Questions (FAQs)
What is an Employee Onboarding Planner Checklist?
An Employee Onboarding Planner Checklist is a structured document that outlines the essential tasks required to onboard a new employee smoothly.
How Can Excel Help in Employee Onboarding?
Excel helps in organizing, tracking, and automating onboarding tasks efficiently, reducing manual effort and ensuring a seamless experience.
Can I Customize the Checklist According to My Organization?
Yes! The checklist is fully customizable. You can add or remove tasks, modify descriptions, and update responsible persons.
How Do I Track Onboarding Progress in Excel?
Use Excel formulas like COUNTIF to track completed tasks and create a progress bar for visual tracking.
Is It Possible to Automate the Checklist?
Yes, you can use Excel formulas, conditional formatting, and macros to automate tracking and updates.
Conclusion
An Employee Onboarding Planner Checklist in Excel is a simple yet powerful tool to streamline the onboarding process. By following best practices and using the right tracking mechanisms, organizations can ensure new employees have a smooth and productive transition.
Click to Employee Onboarding Planner
Visit our YouTube channel to learn step-by-step video tutorials
View this post on Instagram