Have you ever found yourself needing to calculate a date in the future or past by adding or subtracting months? If you have, you’re going to love the EDATE Function in Excel! This handy function makes working with dates super easy. In this post, I’ll guide you through exactly how it works, using simple steps and real examples. Let’s get started EDATE Function in Excel.
What is the EDATE Function, and Why Should You Care?
First things first, the EDATE function allows you to add or subtract months from a date. For example, let’s say you need to figure out what the date will be three months from today, or perhaps you need to know the date six months ago. That’s where EDATE Function in Excel steps in to save the day! It’s a great tool for managing timelines, planning, or just keeping track of important dates.
Here’s the basic formula:
=EDATE (start date, months)
- start date: This is the date you’re starting from.
- months: This is the number of months you want to add (or subtract if you use a negative number).
Don’t worry if this looks complicated right now—it’ll make perfect sense once we walk through a few examples together!
Example: Adding Months to a Date (It’s Easier Than You Think!)
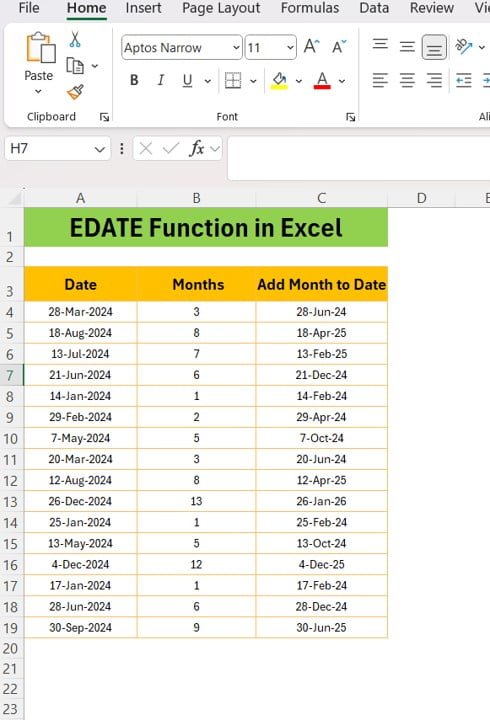
Imagine you have a list of important dates, and you need to know what the date will be after adding a specific number of months. Here’s a simple dataset we’ll use:
In column A, you’ve got your starting dates. In column B, you’ve listed how many months you want to add to each date. Now, let’s use the EDATE function to get the new date after adding those months.
Step-by-Step Formula Breakdown (It’s Quick and Simple!)
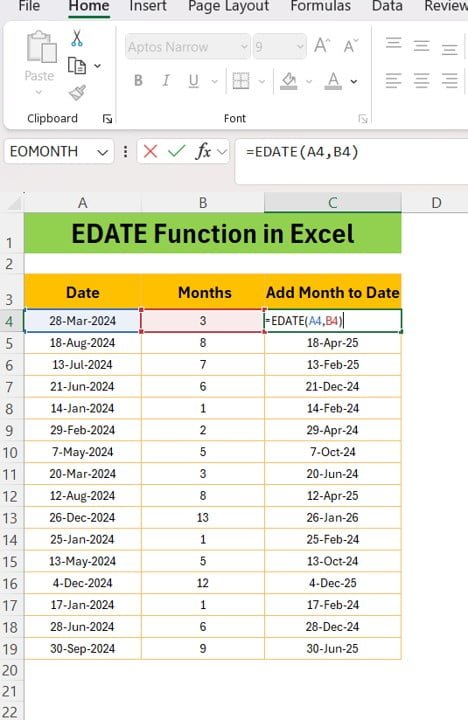
- Select the cell where you want the new date to appear. Let’s use column C for this.
- Enter the formula:
=EDATE (A3, B3)
This formula tells Excel to add the number of months in column B to the date in column A.
- Drag the formula down the column to apply it to the rest of your data.
Once you’ve entered the formula, you’ll get the following results:
It’s that easy! By simply using the EDATE function, you can calculate future or past dates in seconds.
Why Should You Use the EDATE Function?
At this point, you might be wondering why the EDATE function is so useful. Well, here are a few real-life situations where it can make your work so much smoother:
- Project Planning: If you’re managing a project, you can easily calculate deadlines or milestone dates by adding a set number of months to the start date.
- Financial Forecasting: Use it to figure out when payments are due or to calculate future financial reports.
- Event Scheduling: Need to know the exact date for a future event? EDATE has got you covered!
Important Things to Know About EDATE
Before we wrap things up, here are a few key points to keep in mind when using the EDATE function:
- The function always returns a valid date. Even if your start date falls on a leap year, Excel will handle the calculation perfectly.
- You can use negative numbers in the months argument to subtract months instead of adding them. For example, =EDATE (A4, -3) will take the date in cell A4 and subtract three months.
Let’s Recap!
So, there you have it! The EDATE function is a fantastic way to manage date calculations in Excel without any headaches. Whether you’re adding months to a start date or calculating deadlines, this function is a lifesaver.
Why not give it a try right now? You’ll be amazed at how much time it saves you. Plus, if you have any questions or want to share how you’re using the EDATE function, feel free to leave a comment below—we’d love to hear from you!
Visit our YouTube channel to learn step-by-step video tutorials
View this post on Instagram