Excel has a ton of functions to simplify your calculations, and one of the most helpful ones is the EDATE function. Whether you’re managing product expiration dates or projecting timelines for future months, the Calculation with EDATE Function can save you time and effort Calculation with EDATE Function.
In this article, we’ll break down how to use the EDATE function in Excel, complete with practical examples. By the end of this blog, you’ll know how to calculate expiry dates for products using this powerful tool.
What Does the EDATE Function Do?

The EDATE function in Excel is used to add or subtract a specified number of months to or from a given date. It’s particularly handy for managing time-sensitive data like expiration dates, project deadlines, or payment schedules Calculation with EDATE Function.
The syntax for the EDATE function is straightforward:
EDATE(start date, months)
- start date: The date you want to start from.
- months: The number of months to add (positive value) or subtract (negative value).
- Example Scenario: Calculating Expiry Dates
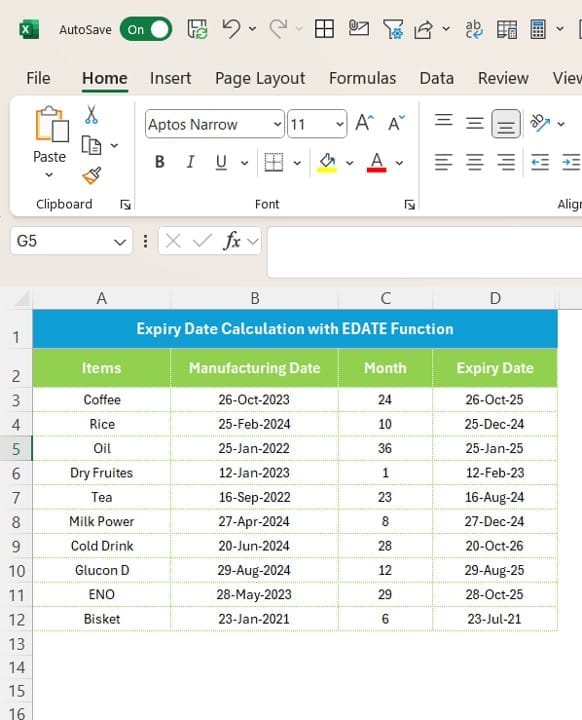
To demonstrate the power of the EDATE function, let’s use a real-life example. Imagine you’re managing inventory and need to calculate the expiry dates for various products based on their manufacturing dates and shelf lives (in months).
Step-by-Step Solution
Understand the Formula

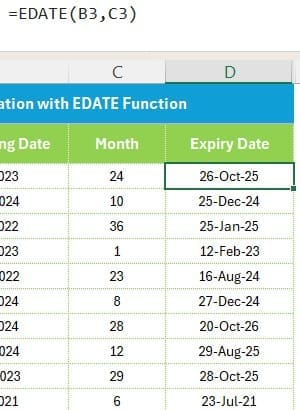
To calculate the expiry date for each product, we’ll use the EDATE function. The formula for the first item in our dataset would look like this:
=EDATE(B2, C2)
- B2: Manufacturing date of the first product.
- C2: Number of months to add to the manufacturing date.
Key Takeaways
- Dynamic Date Calculations: The EDATE function is perfect for tasks that involve adding or subtracting months to dates.
- Ease of Use: With its simple syntax, even beginners can use it effectively.
- Real-World Applications: Great for inventory management, project planning, or financial projections.
Tips for Using EDATE
- Date Formatting: Ensure that your start date column is formatted as a date, or Excel may throw an error.
- Negative Values: Use negative numbers in the months argument to calculate past dates.
- Error Handling: If your dataset has blanks, wrap the EDATE function in an IFERROR formula to avoid errors.
Visit our YouTube channel to learn step-by-step video tutorials
Watch the step-by-step video tutorial:
Click hare to download the practice file


