Part of the free Module 2: Fill, Auto Fill and Flash Fill · Lesson 1 of 6 · Full Excel course
Updated on 5 September 2026 · Works in Excel 365, 2021, 2019 and 2016 unless noted.
The Fill command in Excel copies the value or formula at one edge of a selection into every other cell of that selection, in any direction. Fill Down (Ctrl+D) and Fill Right (Ctrl+R) are the most used, but the same menu also fills up, left and across worksheets, generates number and date series, and re-flows text with Justify. This lesson covers every option with its shortcut.
Where the Fill command lives
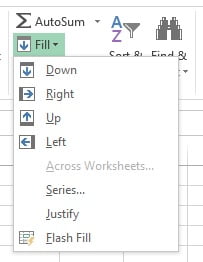
Select the cells you want to fill, including the cell that already holds the value or formula, then go to Home > Editing > Fill. The button is the small down-arrow icon next to Sort & Filter; press Alt+H+F+I to open the menu from the keyboard. The menu offers Down, Right, Up, Left, Across Worksheets, Series, Justify and Flash Fill. Fill is faster than dragging the fill handle over hundreds of rows, and it works without the mouse. The legacy Alt+E+I shortcuts from the old Edit menu still work in every current version and are listed in the table below.
Fill shortcuts at a glance
| Command | Ribbon path | Shortcut | What it copies |
|---|---|---|---|
| Fill Down | Home > Fill > Down | Ctrl+D | Top cell into every cell below it |
| Fill Right | Home > Fill > Right | Ctrl+R | Left-most cell across the row |
| Fill Up | Home > Fill > Up | Alt+E+I+U | Bottom cell into every cell above it |
| Fill Left | Home > Fill > Left | Alt+E+I+L | Right-most cell across to the left |
| Across Worksheets | Home > Fill > Across Worksheets | Alt+H+F+I+A | Active sheet’s selection into the same cells of every grouped sheet |
| Series | Home > Fill > Series | Alt+E+I+S | Generates numbers or dates from a start value |
| Justify | Home > Fill > Justify | Alt+E+I+J | Re-flows text to fit the column width |
| Flash Fill | Data > Flash Fill | Ctrl+E | Completes a column from a typed example |
| Same value in all cells | Type then confirm | Ctrl+Enter | Whatever you typed, into every selected cell |
Fill Down with Ctrl+D
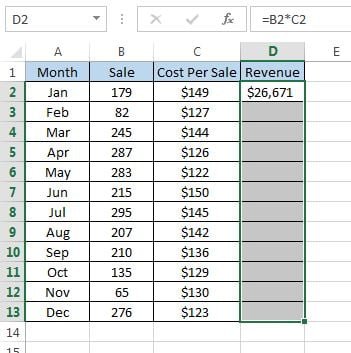
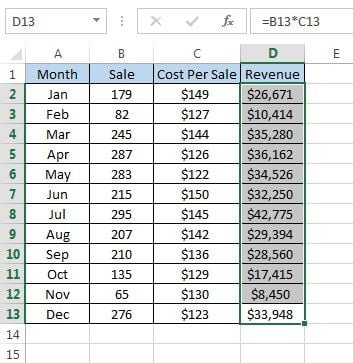
Fill Down copies the top cell of the selection into every cell below it. Formulas adjust their relative references, so a formula in D2 that reads B2*C2 becomes B3*C3 in D3 and so on. Cell D2 holds a formula that must run to row 13.
- Select D2:D13, starting with the cell that contains the formula.
- Press Ctrl+D or choose Home > Fill > Down.
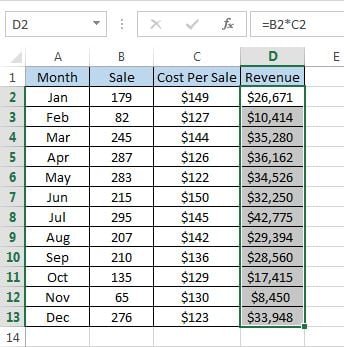
To fill to the last row of a long list without scrolling, select the formula cell, press Ctrl+Shift+Down to extend the selection to the end of the data, then press Ctrl+D. If the column beside it has gaps, use Ctrl+Shift+End instead, or type the range in the Name Box (for example D2:D5000) and press Enter before Ctrl+D.
Fill Up
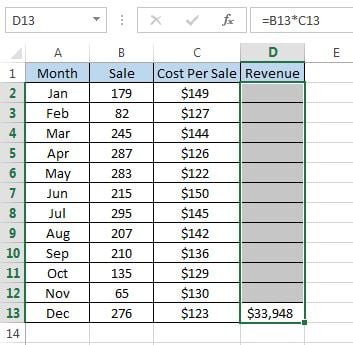
Fill Up copies the bottom cell of the selection upward. With the formula in D13, select D2:D13 and press Alt+E+I+U, or choose Home > Fill > Up. It is useful when a total row already holds the formula and the detail rows above it need the same calculation.
Fill Right with Ctrl+R
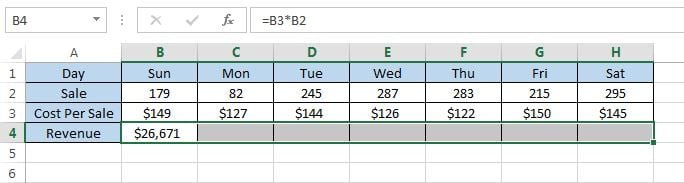
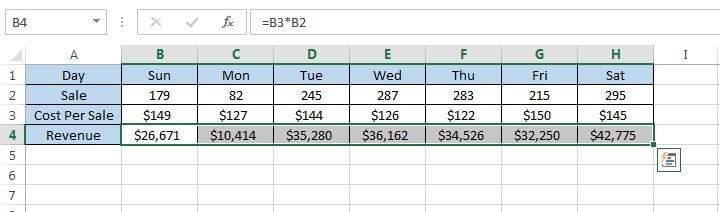
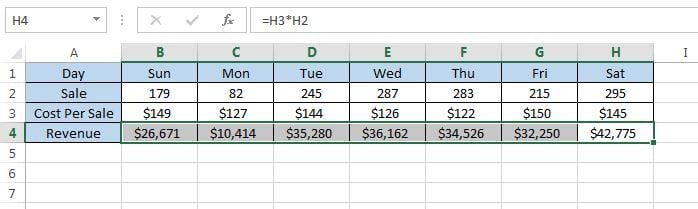
Fill Right copies the left-most cell across the row. With the formula in B4, select B4:H4 and press Ctrl+R. Column references shift as the formula moves right, so a monthly calculation written once in the January column completes the whole year in one keystroke.
Fill Left
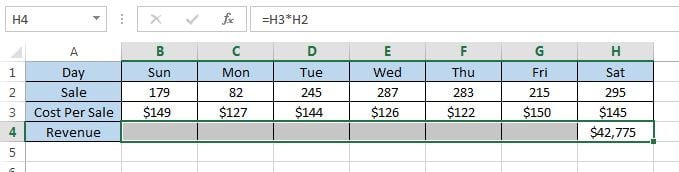
Fill Left copies the right-most cell across to the left. With the formula in H4, select B4:H4 and press Alt+E+I+L, or choose Home > Fill > Left.
Fill Across Worksheets
Fill Across Worksheets copies the selected cells of the active sheet into the same cells on every other selected sheet. It is the quickest way to put one set of headings, formats or formulas on twelve monthly sheets.
- On the source sheet, select the cells to copy.
- Hold Ctrl and click the tabs of the target sheets (or click the first tab, hold Shift and click the last). The title bar shows [Group].
- Choose Home > Fill > Across Worksheets, pick All, Contents or Formats, and click OK.
- Right-click a tab and choose Ungroup Sheets before you continue editing, otherwise every keystroke lands on all grouped sheets.
Fill Series
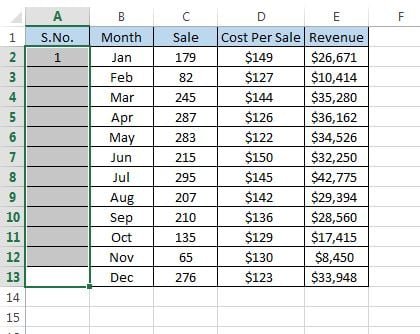
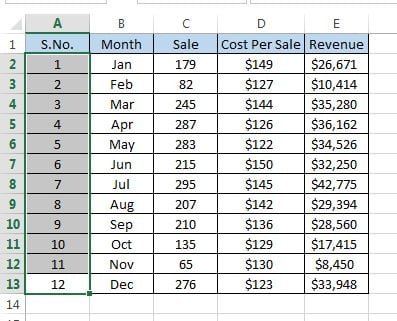
Fill Series generates a sequence from a starting value instead of copying it. To number rows 1 to 12:
- Type 1 in the first cell and select the range to fill, for example A2:A13.
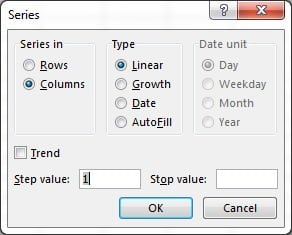
- Choose Home > Fill > Series or press Alt+E+I+S.
- Set Type to Linear and Step value to 1. Growth multiplies by the step, Date increments by Day, Weekday, Month or Year, and AutoFill behaves like dragging the fill handle. Enter a Stop value instead of selecting a range when you know the last number.
- Click OK.
Every option in this dialog, including growth rates, month-end dates and trends, is covered in Fill Series in depth.
Fill Justify
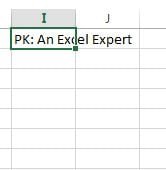
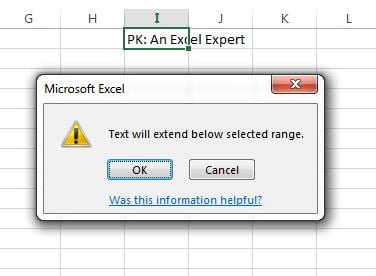
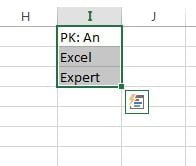
Fill Justify re-flows text that is too long for one cell into the cells below it, breaking at word boundaries so each line fits the column width. Select the cell with the long text, such as I2, plus a few empty cells beneath it, and press Alt+E+I+J. If the text needs more rows than you selected, Excel warns that text will extend below the range; click OK. Justify works the other way too: widen the column, select several short text cells and justify to merge them into one cell. It only handles text, and each cell is limited to 255 characters.
Worked example: complete a sales sheet in three keystrokes
The sheet below has quantities and prices for five products and needs an Amount column plus a monthly header.
| A: Product | B: Qty | C: Price | D: Amount |
|---|---|---|---|
| Pen | 120 | 12 | =B2*C2 |
| Notebook | 40 | 55 | (empty) |
| Stapler | 15 | 210 | (empty) |
| Marker | 60 | 35 | (empty) |
| Folder | 25 | 48 | (empty) |
- Type
=B2*C2in D2, then select D2:D6 and press Ctrl+D. D3 shows 2200, D4 shows 3150, D5 shows 2100 and D6 shows 1200. - In F1 type Jan, select F1:Q1, open Fill > Series, choose AutoFill and click OK. The header reads Jan to Dec.
- In F2 type
=$D2/12, select F2:Q6 and press Ctrl+R then Ctrl+D. The dollar sign keeps every month pointing at column D.
Three shortcuts replaced sixty cells of typing. The reference behaviour in step 3 is explained in AutoFill formulas and absolute references.
Tips and common mistakes
- Include the source cell. Fill copies the edge cell of the selection; if it is not selected, the range is filled with blanks.
- Ctrl+Enter is Fill Down for new entries. Select the range, type the value or formula once and press Ctrl+Enter to place it in every selected cell.
- Fill copies formats too. If you only want the formula, paste with Paste Special > Formulas instead, or reapply the format afterwards.
- Fill overwrites without asking. Anything already in the target cells is replaced. Ctrl+Z undoes it.
- Justify ignores numbers and stops at 255 characters per cell. Convert numbers to text first if they must be part of the paragraph.
- Weekday series skip weekends automatically, but they do not know about public holidays; use NETWORKDAYS or WORKDAY for those.
- Ungroup sheets after Fill Across Worksheets. A grouped workbook silently repeats every edit on all grouped sheets.
Errors and how to fix them
| Problem | Cause | Fix |
|---|---|---|
| Range filled with blanks | The cell holding the value was not part of the selection | Reselect starting from the source cell and fill again |
| Formula results are wrong after filling | Relative references moved to the wrong cells | Lock the fixed part with $ (press F4 in the formula) before filling |
| Fill menu is greyed out | Sheet is protected or you are editing a cell | Press Esc, then Review > Unprotect Sheet |
| “Text will extend below selected range” when justifying | Selected too few rows | Click OK to let Excel use more rows, or select more cells first |
| Justify did nothing | Cell contains a number or a formula | Justify only re-flows text constants |
| Ctrl+D fills the wrong column | Active selection was a single cell | Ctrl+D on one cell copies the cell above; select the full range first |
Practice exercise
Download the Fill practice workbook and try these:
- Fill the formula in D2 down to the last row using only the keyboard (Ctrl+Shift+Down, then Ctrl+D).
- Put the formula from H4 into B4:G4 with Fill Left, then undo and do the same with Fill Right from B4.
- Create serial numbers 1 to 100 in column A with Fill Series and a Stop value, without selecting a range.
- Paste a long sentence in I2 and re-flow it into rows with Fill Justify, then widen column I and merge it back into one cell.
- Add three sheets, group them and use Fill Across Worksheets to copy the header row to all of them.
Key takeaways
- Fill copies the edge cell of a selection in the direction you choose; the source cell must be inside the selection.
- Ctrl+D fills down and Ctrl+R fills right; Fill Up and Fill Left use Alt+E+I+U and Alt+E+I+L or the Fill menu.
- Relative references adjust as formulas are filled; lock fixed cells with $.
- Fill Series generates numbers and dates; Fill Justify re-flows text; Fill Across Worksheets copies to grouped sheets.
- Ctrl+Enter enters one value in every selected cell and is often faster than filling.
Related lessons
- Fill, AutoFill and Flash Fill course hub
- AutoFill with the fill handle and custom lists
- Fill Series in depth: linear, growth and date series
- Fill blank cells with the value above
- Excel shortcut keys course
- TEXT function for formatted dates and numbers
- Microsoft Support: Fill a formula down into adjacent cells
Frequently asked questions
What is the shortcut for Fill Down and Fill Right in Excel?
Ctrl+D fills down and Ctrl+R fills right. Select the range starting with the cell that holds the value or formula, then press the shortcut. Fill Up and Fill Left have no Ctrl shortcut; use Alt+E+I+U and Alt+E+I+L, or press Alt+H+F+I to open the Fill menu and choose the direction.
How do I fill a formula down to the last row without dragging?
Select the formula cell, press Ctrl+Shift+Down to extend the selection to the last row of the adjacent data, then press Ctrl+D. If the neighbouring column has blanks, type the full range such as D2:D5000 in the Name Box, press Enter and then Ctrl+D. Double-clicking the fill handle also works when the adjacent column is complete.
What does Fill Justify do in Excel?
Fill Justify redistributes text across the selected cells so each line fits the column width. It splits one long text cell into several rows, or merges several short rows into one cell when the column is wide enough. It works on text only, not numbers or formulas, and each cell can hold up to 255 characters.
Why did Fill Down leave my cells blank?
The cell containing the value was not inside the selection, so Excel copied an empty top cell. Reselect the range so the first cell is the one with the value or formula and press Ctrl+D again. The same rule applies to Fill Right, Up and Left: the edge cell on the source side must be selected.
How do I copy the same cells to several worksheets at once?
Select the cells on the source sheet, Ctrl+click the tabs of the target sheets so the title bar shows [Group], then choose Home > Fill > Across Worksheets and pick All, Contents or Formats. Right-click a tab and choose Ungroup Sheets afterwards so later edits affect one sheet only.
Video lessons: watch the free Excel tutorials on PK: An Excel Expert on YouTube.
Want the finished version? Ready-made Excel dashboards, trackers and VBA systems are available at NextGenTemplates.com.