Introduction
Data sorting in Excel is a common task for many users. However, when you need to sort large sets of data repeatedly, doing it manually can be both time-consuming and prone to errors. What if you could automate this process with just a few clicks? Welcome to the world of Excel VBA Automation! In this guide, we will provide practical examples of Excel Data Sorting with VBA VBA (Visual Basic for Applications), a built-in programming language for Excel and other Microsoft Office applications.
Why Automate Excel Data Sorting?
The process of sorting data in Excel is not usually complex, but when you’re working with large datasets or repetitive tasks, automating the process can save you a lot of time and significantly reduce the chances of human errors. Automation through VBA allows you to sort your data in various ways, ranging from a simple single column sorting to more complex multi-column sorts, custom sorts, and even automation through a simple double-click action.
Automating Excel Data Sorting with VBA: An Overview
In the following sections, we will dive into the specifics of how you can automate data sorting in Excel using VBA. We will provide easy-to-follow VBA code examples that you can use directly in your own work. So, let’s get started!
Sorting Data by a Single Column using VBA
Let’s say you have a set of data that includes employee names, their supervisors, sales, productivity, quality scores, and attendance. You want to sort this data by a single column – for instance, by employee names.
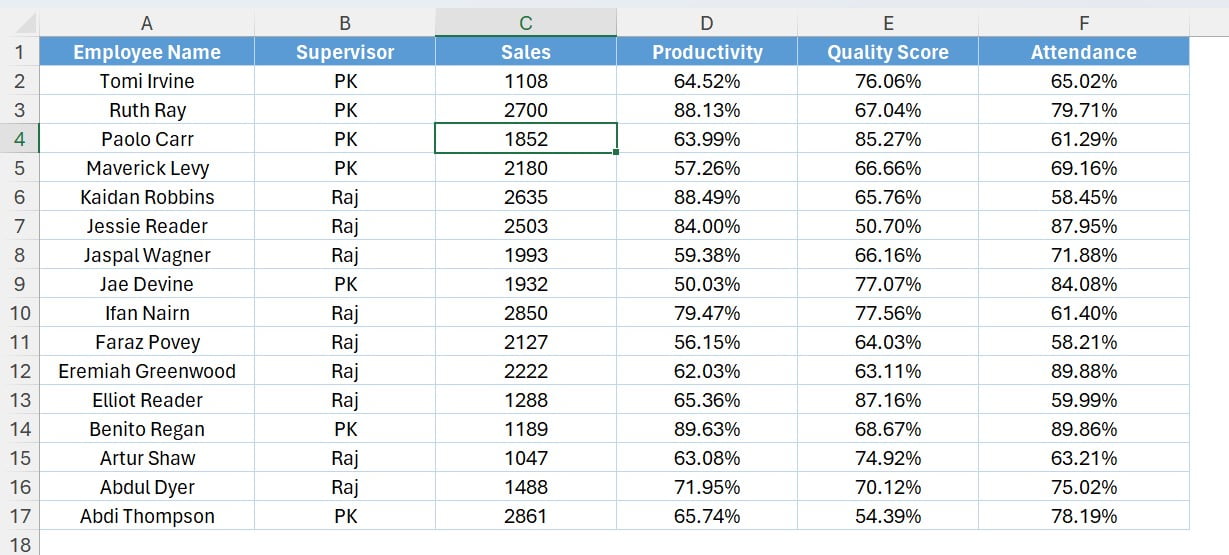
The VBA code to sort the data by a single column is straightforward. Here’s an example:
Sub Sort_By_Single_Column()

Dim sh As Worksheet

Set sh = ThisWorkbook.Sheets("Data")

sh.UsedRange.Sort _

  key1:=sh.Range("A1"), _

  Order1:=xlDescending, _

  Header:=xlYes

End Sub
In the above code, we first define the worksheet containing our data (“Data”). Then, we sort the used range in the sheet using the Sort method. Here, key1:=sh.Range(“A1”) means that we’re sorting based on the values in column A, and Order1:=xlDescending specifies that we’re sorting in descending order. Finally, Header:=xlYes indicates that our data range includes a header.
Sorting Data by Multiple Columns using VBA
What if you want to sort your data by more than one column? For instance, you might want to sort by supervisor first, and then by sales. Here’s how you can do it:
 Sub Sort_By_Multi_Column()

Dim sh As Worksheet

Set sh = ThisWorkbook.Sheets("Data")

sh.UsedRange.Sort _

  key1:=sh.Range("B1"), _

  Order1:=xlAscending, _

  Key2:=sh.Range("C1"), _

  order2:=xlDescending, _

  Header:=xlYes

End Sub
In this code, Key2:=sh.Range(“C1”) and order2:=xlDescending are added to sort by column C in descending order after the initial sorting by column B.
Sorting Data by Row Orientation using VBA
Sometimes, you might want to sort your data from left to right or right to left instead of from top to down. Here’s the VBA code to achieve this:
Sub Sort_By_Column()

Dim sh As Worksheet

Set sh = ThisWorkbook.Sheets("Data")

sh.UsedRange.Sort _

  key1:=sh.Range("A1"), _

  Order1:=xlAscending, _

  Header:=xlYes, _

  Orientation:=xlSortRows

End Sub
In this code, Orientation:=xlSortRows allows you to sort by row orientation.
Sorting Data by a Custom List using VBA
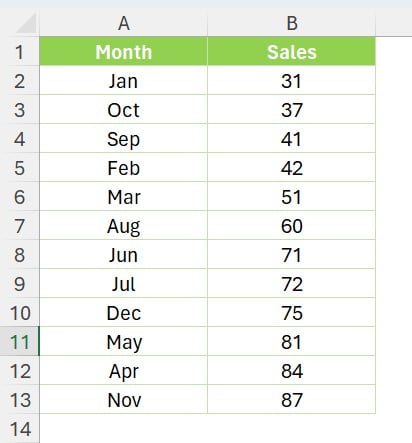
Sometimes, the default sorting order doesn’t meet your needs. For example, if you have sales data for each month, sorting in alphabetical order would result in April coming before January, which is not ideal. In such cases, you can use a custom sort.
Sub Sort_By_Custom_List()

Dim sh As Worksheet

Set sh = ThisWorkbook.Sheets("Custom Sorting")

sh.UsedRange.Sort _

  key1:=sh.Range("A1"), _

  Order1:=xlDescending, _

  Header:=xlYes, _

  ordercustom:=4

End Sub
Here, ordercustom:=4 indicates that we’re sorting by a custom list. The number 4 refers to the custom list of months, which is a built-in list in Excel.
Automating Data Sorting by Double Clicking on the Header
What if you could sort your data by just double-clicking on the header? Yes, it’s possible with VBA!
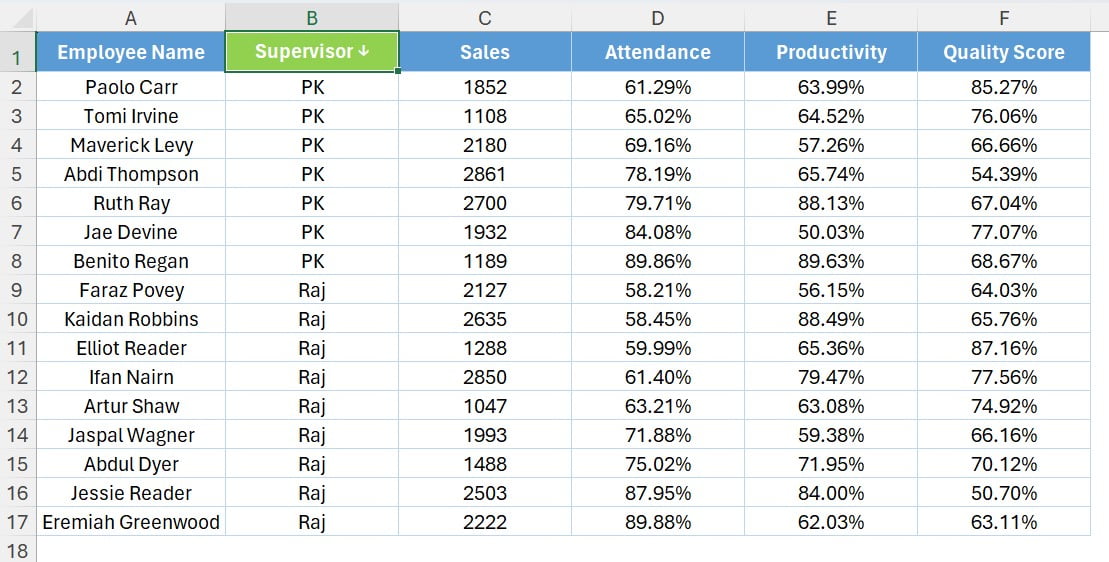
Below is a code example:
Option Explicit

Private Sub Worksheet_BeforeDoubleClick(ByVal Target As Range, Cancel As Boolean)

If Target.Row = 1 And Target.Column <= 6 Then

Dim sh As Worksheet

Set sh = ThisWorkbook.Sheets("Automate Sorting")

Dim Up_Arrow, Down_Arrow As String

Up_Arrow = " " & Application.WorksheetFunction.Unichar(8593)

Down_Arrow = " " & Application.WorksheetFunction.Unichar(8595)

If Right(Target.Value, 2) <> Down_Arrow Then    'Ascending order condition

    With sh.Range("A1:F1")

        .Replace Up_Arrow, ""

        .Replace Down_Arrow, ""

        .Interior.Color = RGB(91, 155, 213)

    End With

       sh.UsedRange.Sort key1:=Target, Order1:=xlAscending, Header:=xlYes

    Target.Value = Target.Value & Down_Arrow

    Target.Interior.Color = RGB(146, 208, 80)

Else


    With sh.Range("A1:F1")

    .Replace Up_Arrow, ""

    .Replace Down_Arrow, ""

    .Interior.Color = RGB(91, 155, 213)

    End With


    sh.UsedRange.Sort key1:=Target, Order1:=xlDescending, Header:=xlYes

    Target.Value = Target.Value & Up_Arrow

    Target.Interior.Color = RGB(237, 125, 49)

End If

Cancel = True

End If

End Sub
This VBA code is assigned to a Worksheet_BeforeDoubleClick event. When you double-click on the header, it sorts the corresponding column data in ascending order on the first click and in descending order on the second click.
Conclusion
In conclusion, automation in Excel using VBA can save you valuable time and increase your productivity, especially when dealing with repetitive tasks like data sorting. We hope that the above Excel VBA automation examples have provided you with a good foundation for automating your Excel data sorting. Now, it’s time to apply these codes in your spreadsheet and see the magic of automation!
Visit our YouTube channel to learn step-by-step video tutorials
Watch the step-by-step video tutorial Excel Data Sorting with VBA
Click here to download the practice file

