Are you looking to manage expiration dates for products effortlessly in Excel? The EDATE function is a powerful tool that can help you calculate future or past dates based on a given date. In this blog post, we will walk you through how to use the EDATE function in Excel with a practical example, ensuring you understand its application fully. Whether you’re managing inventory or just keeping track of important dates, this guide will make it all a breeze.
What is the EDATE Function?
Before we dive into the example, let’s get acquainted with the EDATE function. The EDATE function in Excel allows you to add or subtract a specified number of months to or from a given date. This is particularly useful when you need to calculate expiration dates, due dates, or even forecast future dates based on a starting point.
The syntax of the EDATE function is simple:
=EDATE (start date, months)
- start date: This is the initial date from which you want to calculate.
- months: The number of months you want to add or subtract from the start date. Positive values will move the date forward, while negative values will move it backward.
Now that you know the basics, let’s apply the EDATE function to a real-world scenario.
Practical Example: Calculating Expiry Dates
Imagine you are managing an inventory that includes various items with different manufacturing dates and shelf lives. You need to calculate the expiry dates for these items efficiently. This is where the EDATE function comes to the rescue!
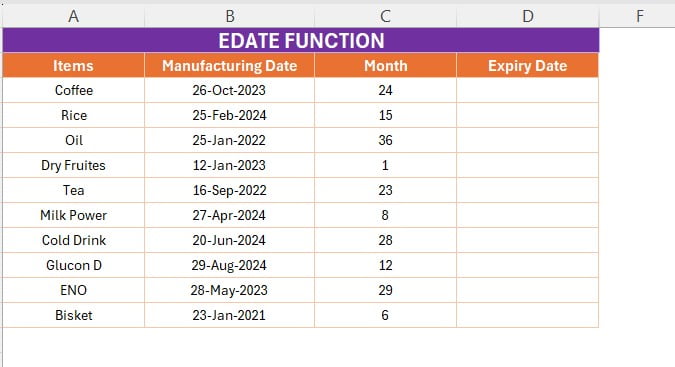
Here’s the data we’ll be working with:
- Column A: Items (Product names)
- Column B: Manufacturing Date (When the product was made)
- Column C: Months (Shelf life of the product in months)
- Column D: Expiry Date (When the product will expire, which we will calculate using the EDATE function)

For each product, we need to calculate the expiry date by adding the shelf life (in months) to the manufacturing date. Here’s the magic formula you’ll use in Excel:
=EDATE (B2, C2)

This formula will take the manufacturing date in Column B and add the number of months specified in Column C to calculate the expiry date, which you will place in Column D.
Applying the EDATE Function
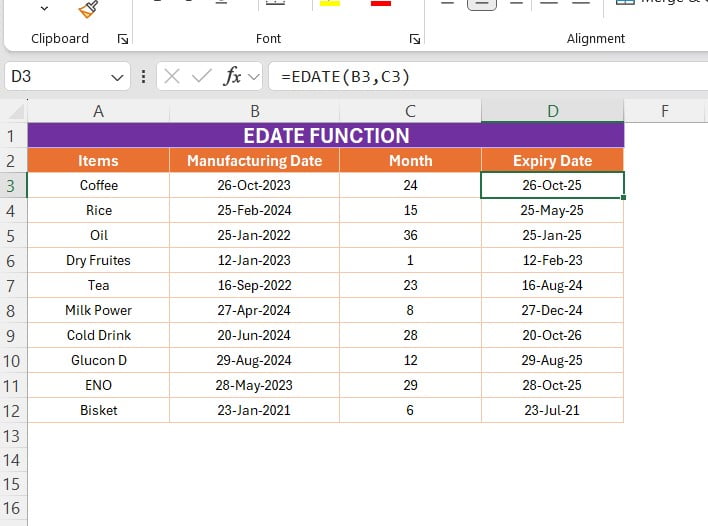
D2: Let’s consider the first item, Coffee, which has a manufacturing date of 26-Oct-2023 and a shelf life of 24 months. To calculate the expiry date, enter the following formula in
=EDATE (B2, C2)
This will return 26-Oct-2025, meaning the coffee will expire two years after it was manufactured.
Repeat this formula for the remaining items in your list. Excel will automatically adjust the formula for each row, calculating the expiry date based on the respective manufacturing date and shelf life.
Why Use EDATE?
Using the EDATE function is not only efficient but also reduces the risk of manual errors. By automating the process of calculating expiry dates, you save time and ensure accuracy, especially when dealing with large datasets. Plus, Excel’s ability to handle dates dynamically means you can easily update your records without redoing calculations.
Final Thoughts:
The EDATE function is an invaluable tool for anyone who needs to manage dates in Excel, from inventory managers to project planners. By understanding how to use this function, you can simplify your workflow and make your Excel spreadsheets even more powerful.
Now that you’ve seen how easy it is to calculate expiry dates with the EDATE function, why not try it out on your data? If you found this guide helpful, don’t forget to check out our YouTube video for a visual walkthrough, and subscribe for more Excel tips and tricks!
This concludes our guide on using the EDATE function in Excel. If you have any questions or need further clarification, feel free to leave a comment below. We’re here to help!
Visit our YouTube channel to learn step-by-step video tutorials
View this post on Instagram


