Managing invoices doesn’t have to be complicated. With the right tools and structure, it can be seamless and stress-free. That’s where an Invoice Payment Checklist comes in handy. This simple yet effective tool ensures you never miss a payment deadline, helps maintain strong vendor relationships, and keeps your processes running smoothly.
In this article, let’s explore everything you need to know about an Invoice Payment Checklist: its purpose, advantages, key features, best practices, and much more.
What Exactly is an Invoice Payment Checklist?
Think of an Invoice Payment Checklist as your roadmap to managing invoices effectively. It is a step-by-step guide to ensure all essential tasks, like verifying details, confirming approvals, and scheduling payments, are completed. This checklist reduces errors, boosts accountability, and makes your payment process more efficient.
Click to Invoice Payment
Key Features of the Invoice Payment Checklist Template
Our Invoice Payment Checklist Template is designed to make managing invoices a breeze. It’s intuitive, easy to use, and customizable to fit your business needs. Let’s break down its core components:
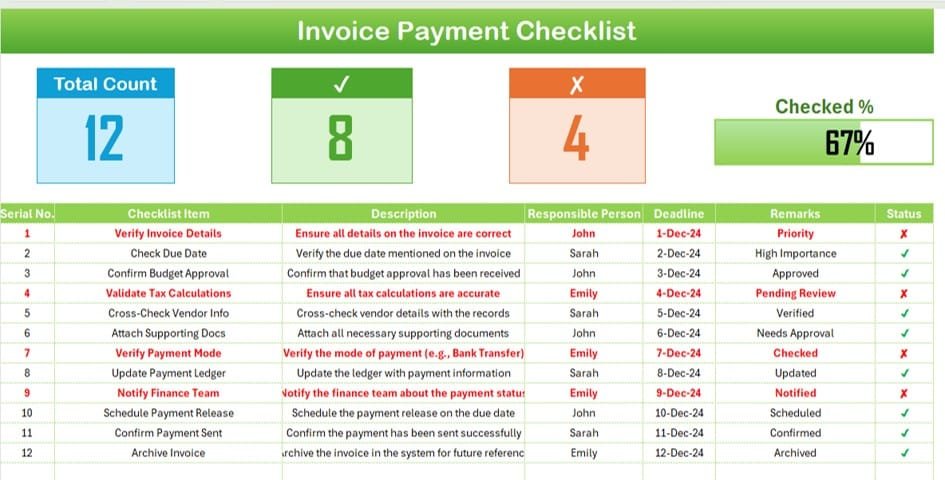
Invoice Payment Checklist (Main Worksheet)
This is the primary workspace where you track and manage all your invoice-related tasks.
Top Section Highlights:
- Total Count: See the total number of tasks in your checklist.
- Checked Count: Track how many tasks are completed.
- Crossed Count: Spot tasks that are marked incomplete or irrelevant.
- Progress Bar: Quickly assess how far along you are with task completion.
Checklist Table Includes:
- Serial No.: Automatically generated numbers for quick reference.
- Checklist Item: The specific task that needs to be done.
- Description: A brief explanation of the task.
- Responsible Person: The team member assigned to the task.
- Deadline: The due date for completing the task.
- Remarks: Space for notes or updates.
- Status: Use ✔ for completed tasks and ✘ for those still pending.

Click to Invoice Payment
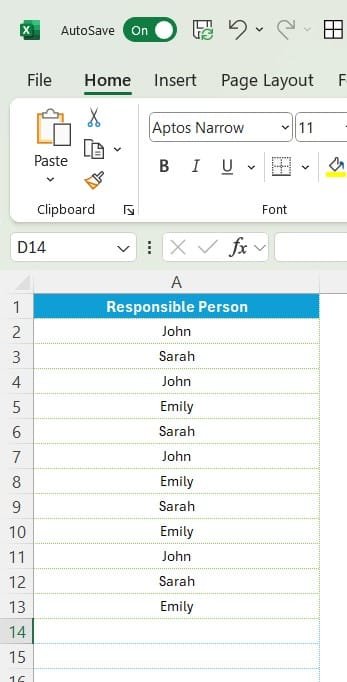
List Sheet Tab
This secondary sheet serves as a repository for unique values, like the list of responsible persons. It allows for easy creation of drop-down menus in the main checklist table, ensuring consistency and minimizing errors.

Click to Invoice Payment
Why Use an Invoice Payment Checklist?
Here’s why an Invoice Payment Checklist is a game-changer for businesses:
- Streamlined Processes: It organizes your tasks in one place, ensuring nothing falls through the cracks.
- Fewer Errors: With clear steps and assigned responsibilities, the checklist helps prevent mistakes like missed deadlines or overlooked details.
- Better Accountability: Assigning tasks to specific individuals creates clarity and fosters responsibility.
- Stronger Vendor Relationships: Timely payments build trust and ensure smooth dealings with your vendors.
- Real-Time Tracking: The progress bar and summary metrics let you see how much of your work is done at a glance.
Best Practices for Using Your Checklist
To get the most out of your Invoice Payment Checklist, follow these tried-and-tested tips:
- Tailor it to Your Needs: No two businesses are the same. Customize your checklist to include tasks, columns, or metrics specific to your process.
- Keep It Updated: Review and update your checklist regularly to reflect new tasks or changes in responsibilities.
- Automate Where Possible: Leverage formulas, conditional formatting, and drop-down menus to simplify repetitive tasks and reduce manual errors.
- Set Regular Reviews: Schedule weekly or bi-weekly reviews to ensure tasks are on track and address any issues proactively.
- Foster Team Communication: Make sure everyone involved understands their roles, deadlines, and expectations.
Opportunities for Improvement
Even with a checklist, there’s always room for growth. Here’s where you can level up:
- Boost Automation: Consider adding macros or scripts to auto-generate updates or send reminders for overdue tasks.
- Collaborate in Real Time: Using tools like Google Sheets can allow team members to work on the checklist simultaneously, wherever they are.
- Gather Vendor Feedback: Include a column for vendor feedback to understand their perspective and make process adjustments as needed.
- Analyze Metrics: Use historical data to find bottlenecks in your process. For instance, if approvals often cause delays, focus on streamlining that step.
How to Create Your Own Invoice Payment Checklist
Building an Invoice Payment Checklist from scratch might sound daunting, but it’s simpler than you think. Just follow these steps:
Step 1: Plan Your Structure
List the tasks you want to include, such as verifying invoice details, confirming approvals, and updating payment records.
Step 2: Set Up Columns
Create columns like:
- Serial No.
- Checklist Item
- Description
- Responsible Person
- Deadline
- Remarks
- Status (✔ or ✘)
Step 3: Add Summary Metrics
Incorporate formulas to calculate the total number of tasks, completed tasks, and progress percentage.
Step 4: Automate Repetitive Entries
Use drop-down menus for fields like Responsible Person to save time and ensure consistency.
Step 5: Test and Adjust
Run a few test scenarios to check if your checklist covers all tasks and make necessary adjustments.
Frequently Asked Questions (FAQs)
- Why do I need an Invoice Payment Checklist?
An Invoice Payment Checklist ensures every payment-related task is completed on time, reducing errors and improving efficiency.
- How do I customize it for my business?
You can add new columns, adjust the structure, or integrate automation tools like conditional formatting or VBA scripts.
- Can I use this checklist with Google Sheets?
Absolutely! Google Sheets is a great way to share and collaborate on your checklist in real time.
- How often should I update my checklist?
Weekly updates are ideal to keep it relevant and ensure no tasks are overlooked.
- Can I track overdue tasks?
Yes, by using conditional formatting, you can highlight overdue tasks in red for better visibility.
Final Thoughts
An Invoice Payment Checklist isn’t just a tool—it’s your partner in simplifying and streamlining your payment process. By keeping everything organized, reducing errors, and ensuring accountability, this checklist can save you time and hassle. So why wait? Start using this template today and take your invoice management to the next level!
Visit our YouTube channel to learn step-by-step video tutorials
View this post on Instagram

