If you’ve ever wondered how to split text in Excel, you’re in for a treat! In this blog post, we’ll dive deep into two powerful yet often overlooked functions in Excel: the LIFT & RIGHT Function in Excel. These functions can save you tons of time when working with text data, especially if you need to extract parts of a string. Let’s explore these functions with real examples to make the learning process smooth and enjoyable LIFT & RIGHT Function in Excel .
Understanding the LIFT & RIGHT Functions in Excel
Before we get hands-on, let’s first break down what each of these functions does:
- LIFT Function: Used to extract a specific number of characters from the left side of a text string.
- RIGHT Function: Used to extract a specific number of characters from the right side of a text string.
In this guide, we’ll show you how to use these functions on sample data to efficiently separate different parts of a text string. By the end of this, you’ll be confident in handling these tasks yourselfLIFT & RIGHT Function in Excel
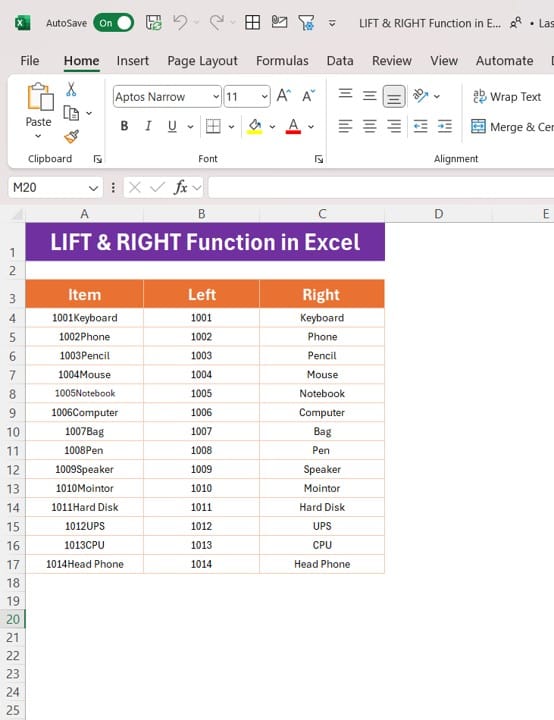
Example Data for LIFT & RIGHT Functions
Now, let’s learn how to extract the LIFT & RIGHT Function in Excel portions of each Item using Excel’s functions.
Step-by-Step: Using the LIFT & RIGHT Functions
Step 1: Extracting the Left Side with LIFT Function

Our goal is to extract the numeric code at the beginning of each Item. To achieve this, we’ll use the LIFT function.
Here’s the formula:
=LEFT (A4, 4)
Let’s break down what’s happening here:
- A4: Refers to the cell containing the item (e.g., 1001Keyboard).
- 4: This tells Excel to extract the first 4 characters from the left side of the string.
When you apply this formula to cell A4, Excel will return 1001. Easy, right?
Step 2: Extracting the Right Side with RIGHT Function
Now, let’s extract the text portion from the Item field (everything after the first 4 characters). For that, we’ll use the RIGHT function, but with a twist: we’ll combine it with the LEN function to get the exact length of the string.
Here’s the formula:
=RIGHT (A4, LEN(A4)-4)
What’s happening here:
- LEN(A4): This calculates the total number of characters in the string.
- LEN(A4)-4: This subtracts 4 from the total, giving us the number of characters to extract from the right side.
By applying this formula, Excel will return Keyboard from 1001Keyboard.
The Final Output
Why You Should Use the LIFT & RIGHT Functions
These two functions are incredibly handy when working with data that contains both numbers and text in the same cell. Here are a few reasons why you should consider using them:
- Saves Time: Quickly separate text from numbers without manual edits.
- Reduces Errors: No need to manually input text splits, which could lead to mistakes.
- Increases Productivity: Once you master these functions, you’ll handle data more efficiently.
Wrapping Up
The LIFT & RIGHT Function in Excel are simple yet powerful tools for anyone working with text in Excel. Whether you need to split product codes from their names or perform similar tasks, these functions have got you covered. Practice with the examples we’ve shared, and soon, you’ll be an Excel pro at manipulating text LIFT & RIGHT Function in Excel
I hope this post helps you master text splitting with Excel! If you have any questions, feel free to leave them in the comments below or watch our video for further insights LIFT & RIGHT Function in Excel .
Visit our YouTube channel to learn step-by-step video tutorials
View this post on Instagram
Click hare to download the practice file