Managing risks effectively is vital for ensuring the safety and efficiency of any workplace or project. A Risk Assessment Checklist Template in Excel provides a structured way to identify, evaluate, and mitigate potential hazards. This ready-to-use template simplifies risk management and improves accountability within teams.
In this article, we will walk you through everything you need to know about this Risk Assessment Checklist Template, including its features, advantages, and best practices for effective implementation. Whether you are new to risk assessment or a seasoned professional, this guide is tailored to help you get started.
Features of the Risk Assessment Checklist Template
This Risk Assessment Checklist Template in Excel comes equipped with user-friendly features to make risk tracking seamless. The template consists of two main worksheets:
Risk Assessment Checklist Sheet Tab
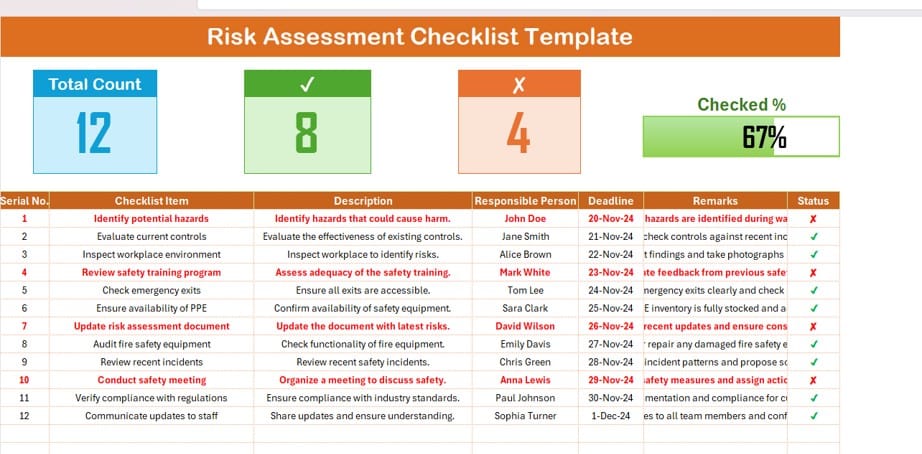
The Risk Assessment Checklist sheet tab is the core component of the template where you manage and monitor risks. It includes:
Top Section
-
Summary Cards:
The top section provides three cards summarizing the status of your checklist:
- Total Count: Displays the total number of checklist items.
- Checked Count: Shows the number of completed items (✔).
- Crossed Count: Indicates the number of pending items (✘).
- Progress Bar: Visualizes the percentage of completed items for quick tracking.
Checklist Table
The checklist table is where you record and update all the relevant risk details. The table includes the following columns:
- Serial No.: A unique identifier for each task.
- Checklist Item: A brief description of the risk-related task.
- Description: Detailed information about the task.
- Responsible Person: The individual accountable for completing the task.
- Deadline: The due date for completing the task.
- Remarks: Additional notes or observations related to the task.
- Status: Status of the task, marked as ✔ (completed) or ✘ (pending).
List Sheet Tab
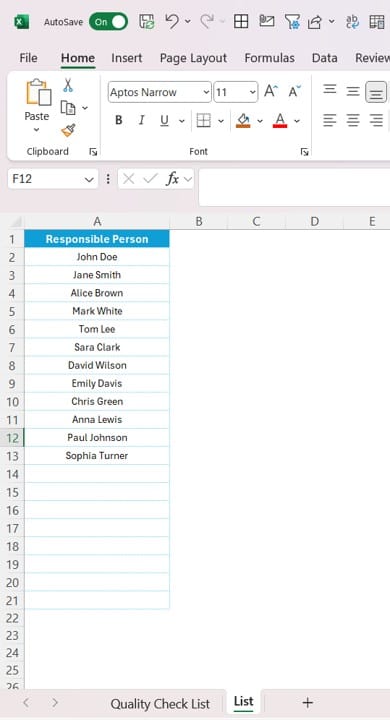
The List sheet tab stores the unique list of Responsible Persons, which is used to create drop-down lists in the main checklist table. This feature ensures consistency and reduces manual errors when assigning tasks.
Advantages of Using the Risk Assessment Checklist Template
Implementing this template can significantly enhance your risk management process. Here are the key advantages:
- Streamlined Risk Tracking: The template provides a clear and organized way to track all risk-related activities in one place.
- Improved Accountability: Assigning tasks to specific individuals ensures everyone knows their responsibilities and deadlines.
- Progress Monitoring: The top-section cards and progress bar make it easy to monitor the status of your risk assessment tasks at a glance.
- Time-Saving Automation: Using drop-down lists for Responsible Persons and predefined columns minimizes repetitive data entry.
- Customizable to Your Needs: The template is fully customizable, allowing you to adjust the checklist items, columns, or formatting to suit your specific requirements.
Best Practices for Using the Risk Assessment Checklist Template
To get the most out of this template, follow these best practices:
- Clearly Define Tasks: Break down each risk-related activity into specific, actionable items. For example, instead of “Check safety equipment,” specify tasks like “Audit fire safety equipment.”
- Assign Responsibilities Thoughtfully: Ensure that the Responsible Person column is filled with individuals who have the expertise and authority to complete the tasks effectively.
- Set Realistic Deadlines: Deadlines should be achievable and aligned with project timelines to avoid last-minute rushes.
- Regularly Update Status: Review and update the checklist status periodically to reflect progress and address pending tasks promptly.
- Incorporate Feedback: After completing the risk assessment, gather feedback from team members to improve the checklist for future use.
How to Use the Risk Assessment Checklist Template
Here’s a step-by-step guide to getting started with the template:
- Download and Open the Template: Open the Excel file containing the template.
- Fill Out the Checklist Table: Enter the relevant details in each column, including Checklist Item, Description, Responsible Person, Deadline, and Remarks.
- Update the Status: Use ✔ for completed tasks and ✘ for pending ones in the Status column.
- Monitor Progress: Review the summary cards and progress bar in the top section to track overall progress.
- Maintain the List Sheet: Add or update Responsible Persons in the List sheet tab as needed.
Frequently Asked Questions (FAQs)
Q. What is a Risk Assessment Checklist Template?
A Risk Assessment Checklist Template is a structured tool used to identify, evaluate, and mitigate potential risks in a project or workplace. It ensures that all hazards are accounted for and responsibilities are clearly assigned.
Q. Who Should Use This Template?
This template is ideal for project managers, safety officers, compliance teams, and anyone responsible for managing risks in their organization.
Q. Can I Customize the Template?
Yes, the template is fully customizable. You can add or remove columns, change formatting, or update checklist items to fit your specific needs.
Q. How Often Should I Update the Checklist?
You should update the checklist whenever there are changes to the project scope, new risks are identified, or tasks are completed.
Q. Is Excel the Best Tool for Risk Assessment Checklists?
Excel is an excellent choice for risk assessment checklists due to its flexibility and ease of use. However, for larger or more complex projects, dedicated risk management software might be more suitable.
Conclusion
A Risk Assessment Checklist Template in Excel is an invaluable tool for managing workplace and project risks effectively. With its organized structure, user-friendly features, and adaptability, this template ensures that nothing slips through the cracks. By following best practices and updating the checklist regularly, you can create a safer, more efficient environment for your team.
Visit our YouTube channel to learn step-by-step video tutorials
Watch the step-by-step video tutorial:
