A roof inspection checklist is an essential tool for homeowners, property managers, and contractors to ensure that the roof remains in optimal condition. Whether you’re preparing to buy or sell a home, or simply maintaining your property, a thorough roof inspection is key to identifying any potential issues early on and avoiding costly repairs. This checklist template can help simplify and streamline the process, providing an easy-to-use structure for tracking inspection results and maintaining roof integrity.
In this article, we’ll walk through the features and benefits of the Roof Inspection Checklist Template, and how it can be effectively used to inspect and monitor roof conditions. We’ll also highlight best practices for using the checklist, opportunities for improvement, and how it fits into your larger property maintenance plan.
What is a Roof Inspection Checklist?
A Roof Inspection Checklist is a tool used by property owners, inspectors, or contractors to evaluate the condition of a roof. It helps ensure that every part of the roof is thoroughly examined for signs of wear and tear, leaks, or other issues that could lead to bigger problems down the line. The checklist typically includes details about the roof’s structure, materials, and accessories, such as gutters, chimneys, and ventilation.
This checklist is designed to be a comprehensive guide for roof inspections, offering a standardized approach to evaluating a roof’s condition, thus preventing unexpected repairs and costly damages.
Key Features of the Roof Inspection Checklist Template
The Roof Inspection Checklist Template has been designed to make the inspection process easier and more effective. Below are the key features that make this checklist an essential tool for anyone conducting a roof inspection:
1. Main Sheet Tab: Roof Inspection Checklist
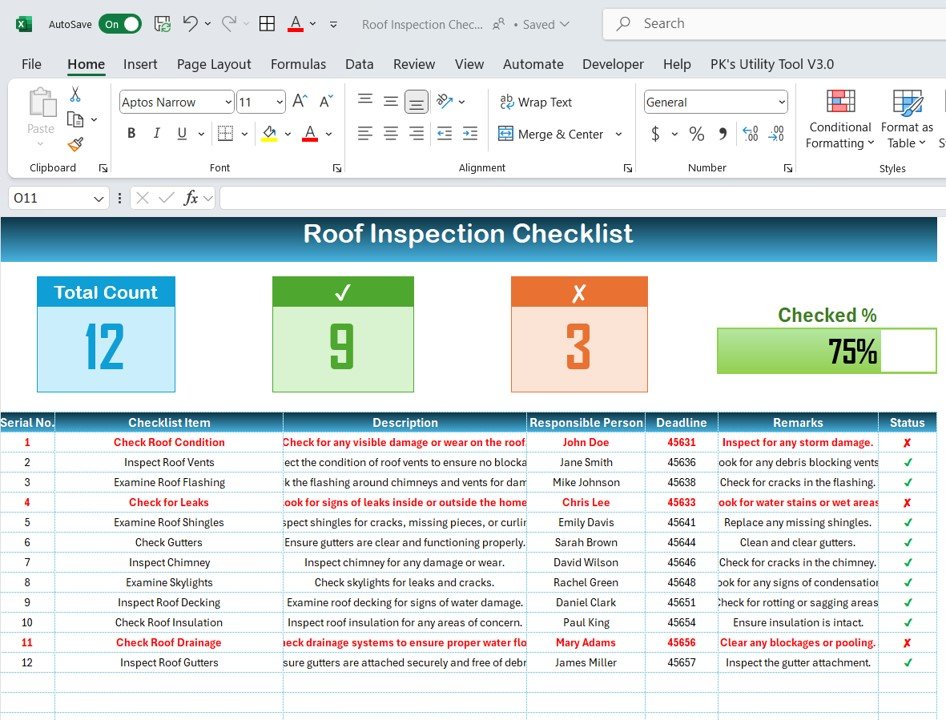
This is the core sheet where all the roof inspection information is recorded. The top section of the sheet contains three quality control cards that provide a quick snapshot of the inspection status:
- Total Count: Displays the total number of items on the checklist.
- Checked Count: Shows how many items have been completed.
- Crossed Count: Indicates how many items have failed or require attention.
- Progress Bar: Provides a visual representation of the completion percentage based on the items that have been checked off.

Click to Roof Inspection
2. Checklist Table
The checklist table is where the actual inspection data is entered. This table is structured with the following columns:
- Serial No.: Unique identifier for each item on the checklist.
- Checklist Item: A brief description of the roof component being inspected (e.g., shingles, flashing, chimney).
- Description: More detailed information about the checklist item.
- Responsible Person: Name of the individual responsible for inspecting or handling the item.
- Deadline: Date by which the inspection or repair should be completed.
- Remarks: Notes about the inspection results or any issues identified.
- Status: The current status of the checklist item. This can be marked as ✔ (complete) or ✘ (requires attention).
3. List Sheet Tab
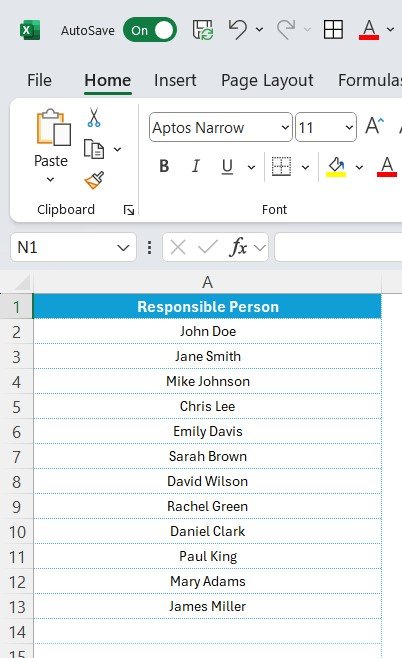
The second sheet captures a unique list of responsible persons to help create a dropdown menu in the main checklist table. This allows inspectors to assign tasks or roles clearly. The List Sheet provides an organized list of team members, making it easier to track who is responsible for each item in the checklist.

Click to Roof Inspection
4. Easy Navigation and User-Friendly Interface
The template is designed to be intuitive and easy to use. The main sheet has an interactive interface, with dropdown lists for statuses and responsible persons, as well as automatic progress tracking. This makes it simple to keep track of inspection results and ensures that nothing is overlooked during the process.
Advantages of Using a Roof Inspection Checklist
Using a Roof Inspection Checklist offers several benefits, ensuring that your roof stays in good condition and preventing unnecessary repairs.
- Efficient Tracking: The checklist helps track all items during a roof inspection, ensuring that no part of the roof is left unchecked.
- Clear Overview: With progress bars, total counts, and visual indicators, users can easily see the status of each item, helping prioritize areas that need immediate attention.
- Time-Saving: With clear sections for responsible persons, deadlines, and remarks, the template simplifies the task of organizing the roof inspection process, saving time.
Best Practices for Using the Roof Inspection Checklist
To ensure that you get the most value from your Roof Inspection Checklist, consider these best practices:
- Update the Checklist Regularly: Make sure the checklist is regularly updated to reflect changes in roof conditions, new components, or any repairs. Regular updates ensure that the checklist remains an accurate tool for monitoring roof health.
- Assign Responsibilities Clearly: Use the dropdown list to assign clear responsibility for each item on the checklist. This ensures that each inspection task is carried out by the right person, and any issues can be traced back to the responsible party.
- Set Realistic Deadlines: Provide deadlines for each checklist item to ensure that repairs and inspections are completed in a timely manner. This helps keep your roof in optimal condition and prevents small issues from turning into major problems.
- Review Inspection Results Thoroughly: After completing the checklist, review the results and identify any recurring issues. Address these areas immediately to prevent future complications and reduce maintenance costs.
Opportunities for Improvement in Roof Inspections
While the Roof Inspection Checklist is a powerful tool, there are several ways you can improve the process:
Incorporate More Detailed Metrics: While the checklist currently tracks basic roof components, you could expand it to include more detailed metrics such as material condition, insulation quality, and specific measurements (e.g., leaks per square meter). This would make the inspection even more thorough and actionable.
Use Automated Reminders: Automating reminders for upcoming inspections or deadlines can help ensure that inspections are conducted on time, reducing the risk of missing necessary repairs.
Add Mobile Compatibility: Making the checklist mobile-friendly could allow inspectors to access it on-site, enter data in real-time, and take photos of any issues that arise. This would improve the accuracy of the inspection and make it easier to keep records.
Conclusion
A Roof Inspection Checklist is an invaluable tool for ensuring your roof remains in top condition and free from costly issues. Whether you’re conducting routine maintenance, preparing for a property sale, or evaluating potential repairs, this checklist helps streamline the process and improve accuracy. By using the checklist effectively and following best practices, you can ensure that your roof is regularly maintained and remains compliant with relevant standards.
Frequently Asked Questions (FAQs)
1. What is a Roof Inspection Checklist?
A Roof Inspection Checklist is a tool used to evaluate the condition of a roof, including its components and performance, to ensure it remains intact and free from damage.
2. How often should I perform a roof inspection?
It is recommended to conduct a roof inspection at least twice a year, ideally in the spring and fall, to assess any damage caused by weather conditions.
3. How do I use the Roof Inspection Checklist template effectively?
To use the checklist effectively, assign responsible persons, set clear deadlines, update the checklist regularly, and review the results after each inspection.
4. Can I customize the Roof Inspection Checklist template?
Yes, the checklist template can be customized to fit the specific needs of your property, adding or removing items based on your roof’s unique components.
Visit our YouTube channel to learn step-by-step video tutorials


