When it comes to sales, preparation is key. A well-structured sales pitch can make or break a deal. It is not enough to simply know your product or service; you must communicate its value in a compelling way that resonates with your prospects. One of the most effective ways to ensure your pitch is successful is by using a Sales Pitch Preparation Checklist. This checklist helps you organize your thoughts, stay on track, and deliver a pitch that captures attention and converts prospects into clients.
In this article, we will delve deep into what a Sales Pitch Preparation Checklist is, how it works, and why it’s indispensable for your sales strategy. We will also explore its advantages, opportunities for improvement, best practices, and common questions that arise when preparing your sales pitch.
What is a Sales Pitch Preparation Checklist?
A Sales Pitch Preparation Checklist is a structured tool that helps sales professionals organize and track the various steps required to prepare an effective pitch. This checklist ensures that every critical element of the pitch is addressed, such as understanding the prospect’s needs, aligning your solution, and delivering a persuasive message. By using this checklist, you can streamline your preparation process, avoid missing important details, and increase your chances of closing the deal.
Key Features of the Sales Pitch Preparation Checklist Template
The Sales Pitch Preparation Checklist Template is a ready-to-use, easy-to-customize tool for organizing and preparing your sales pitch. It consists of two main worksheets:
- Sales Pitch Preparation Checklist: This is the main worksheet where you will capture and manage all checklist items related to the pitch preparation.
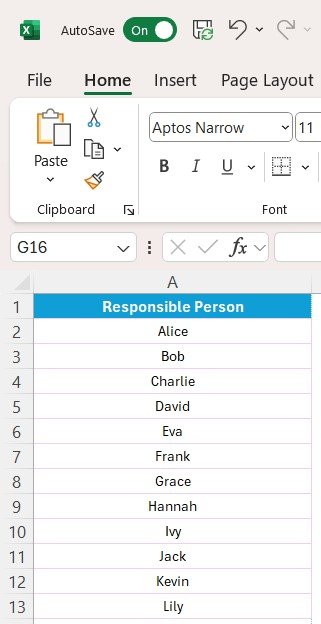
- List Sheet Tab: This sheet captures the list of responsible persons, helping you create a drop-down list in the main table for better task management.
Sales Pitch Preparation Checklist Sheet
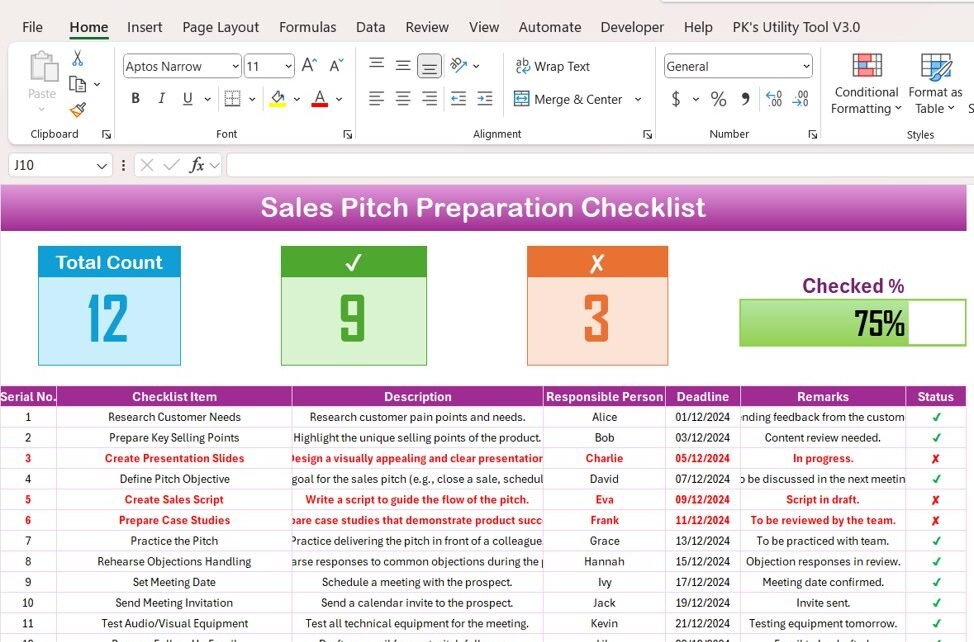
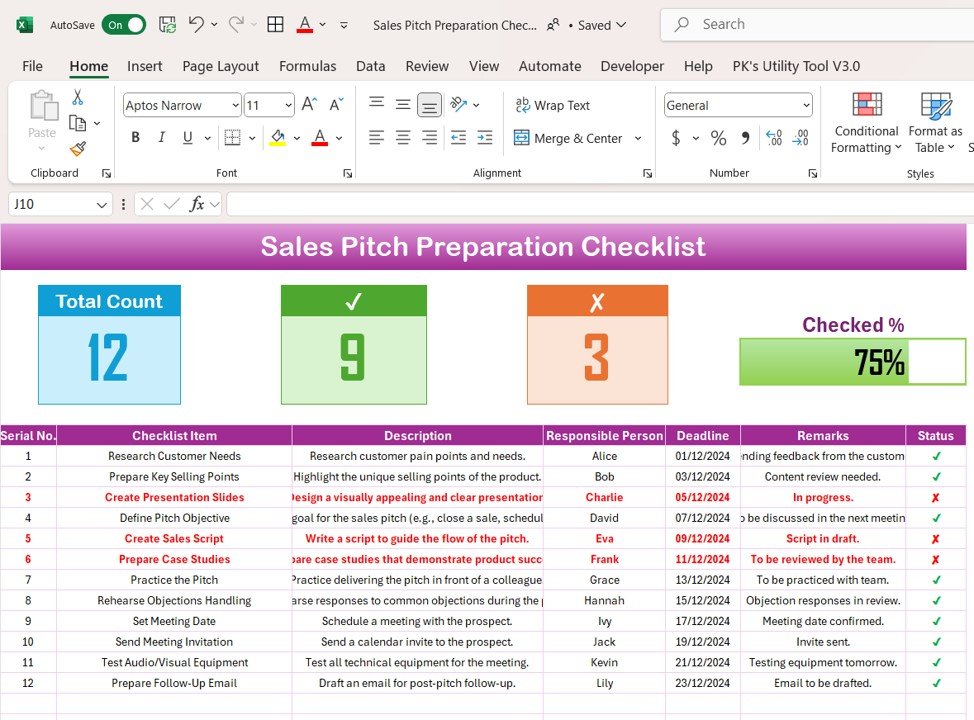
The Sales Pitch Preparation Checklist Sheet provides a structured way to track your progress. The sheet is divided into two key sections: the Top Section and the Checklist Table.
Top Section: Overview and Progress Tracking
The Top Section of the worksheet offers an overview of the entire checklist. Here, you’ll find:
- Total Count: The total number of tasks in the checklist.
- Checked Count: The number of completed tasks.
- Crossed Count: The tasks that have been marked as irrelevant or unnecessary.
- Progress Bar: A visual representation of how much of the checklist has been completed.
Click to Purchase Sales Pitch Preparation Checklist in Excel
This section helps you quickly see how far you’ve come in your preparation and where you need to focus more effort.
Checklist Table: Core Tracking Section
The Checklist Table is where the bulk of the work is done. It includes the following columns:
- Serial No.: A unique identifier for each task.
- Checklist Item: A brief description of the task or item to be completed.
- Description: A detailed explanation of the task.
- Responsible Person: The person assigned to complete the task.
- Deadline: The date by which the task should be completed.
- Remarks: Any additional notes or instructions related to the task.
- Status: This is where you mark whether the task is completed (✔) or pending (✘).
The Status column helps you track the progress of each individual task and ensures accountability.
List Sheet Tab: Responsible Person List
The List Sheet Tab provides a unique list of responsible persons, allowing you to create a drop-down list in the main checklist. This feature helps you maintain consistency by selecting individuals from the list rather than typing their names manually, ensuring that the correct person is assigned to each task.
Advantages of Using a Sales Pitch Preparation Checklist
Utilizing a Sales Pitch Preparation Checklist can provide numerous benefits for your sales team. Let’s explore the top advantages:
- Organization and Clarity: A checklist provides clarity by organizing all the critical steps needed for preparing your sales pitch. Instead of scrambling to remember what needs to be done, you can follow the checklist and stay on track. The well-defined structure makes it easier to manage tasks, deadlines, and responsibilities.
- Improved Focus and Efficiency: A checklist helps you focus on the most important elements of your pitch. By breaking down the preparation process into actionable items, you avoid feeling overwhelmed by the complexity of creating a pitch. Each task is clearly defined, making your preparation more efficient.
- Accountability and Collaboration: With assigned responsibilities and deadlines, a checklist promotes accountability within your team. Each team member knows what they need to do and by when, which leads to better collaboration and timely task completion.
- Consistent Messaging: Using a checklist ensures that every key point is covered in the pitch. By following a standardized process, you can ensure consistency in messaging, making your pitch more professional and aligned with your company’s goals.
- Easy Tracking of Progress: The progress bar and checked count in the template help you easily track your preparation progress. If some tasks are falling behind, you can quickly identify them and take corrective action before your presentation.
Opportunities for Improvement in Sales Pitch Preparation
While a Sales Pitch Preparation Checklist is an invaluable tool, there are always opportunities for improvement. Here are a few ways to refine your approach:
- Incorporate Client Insights and Customization: Rather than following a one-size-fits-all approach, consider tailoring the checklist based on the client’s specific needs and preferences. Incorporating insights about your client into the preparation process can make your pitch more personalized and relevant.
- Use Automation and Technology: Many sales teams benefit from automating certain aspects of the checklist. Integrating your checklist with CRM software or project management tools can streamline the process, automatically assigning tasks, sending reminders, and updating statuses.
- Add More Metrics and KPIs: To better assess the success of your sales pitch preparation, consider adding measurable metrics to the checklist. For instance, you could track the time spent on each task, the effectiveness of each pitch element, or the feedback received from team members.
- Continuous Improvement: As your team gains experience, regularly review the checklist and make updates to improve it. Over time, you’ll identify areas that need more focus or new elements that should be added. A checklist is a living document that should evolve as your sales strategies and goals change.
Best Practices for Sales Pitch Preparation
To make the most of your Sales Pitch Preparation Checklist, follow these best practices:
- Break the Pitch into Smaller Tasks: Rather than focusing on the pitch as a whole, break it down into smaller, more manageable tasks. This makes it easier to track progress and ensures that no aspect of the pitch is overlooked.
- Set Clear Deadlines: Each task in the checklist should have a clear deadline. This helps your team stay on schedule and prevents last-minute scrambling. Make sure the deadlines are realistic and allow ample time for review and revisions.
- Assign Roles and Responsibilities Clearly: Assign a specific person to each task in the checklist. This ensures accountability and prevents confusion. Make sure everyone knows their responsibilities and deadlines.
- Collaborate and Communicate Regularly: Communication is key when preparing a sales pitch. Regularly check in with your team to ensure that tasks are being completed and that there are no roadblocks. Collaboration allows for feedback and improvement, ensuring a stronger pitch.
- Review and Refine the Pitch: Before presenting the pitch to your client, take time to review and refine it. Use the checklist to ensure all elements are covered, and make adjustments based on feedback from team members. A polished, well-prepared pitch is much more likely to succeed.
Conclusion
A Sales Pitch Preparation Checklist is an essential tool for ensuring that your sales team is well-prepared, organized, and focused on delivering a compelling pitch. By following the steps outlined in this article, you can streamline your preparation process, improve team collaboration, and increase your chances of closing the deal. Whether you are a seasoned sales professional or just starting, using a checklist will enhance your efficiency and effectiveness.
Frequently Asked Questions (FAQs)
What is the purpose of a Sales Pitch Preparation Checklist?
A Sales Pitch Preparation Checklist ensures that all critical steps are covered before delivering a sales pitch. It helps organize tasks, track progress, and assign responsibilities.
How can a checklist improve sales pitch preparation?
By breaking down the preparation into smaller tasks, a checklist helps ensure that all elements of the pitch are well-prepared, making the process more organized and efficient.
Can the checklist be automated?
Yes, integrating the checklist with CRM or project management software can automate tasks, assign responsibilities, and send reminders, making the process even more efficient.
What should be included in a Sales Pitch Preparation Checklist?
A Sales Pitch Preparation Checklist should include tasks such as understanding the prospect’s needs, crafting a tailored message, creating visuals, and assigning responsibilities and deadlines.
How often should the checklist be updated?
The checklist should be updated regularly, especially after each pitch cycle. Continual updates allow the checklist to evolve with changing client needs and sales strategies.
Visit our YouTube channel to learn step-by-step video tutorials
View this post on Instagram
