In this guide, we’ll walk you through a practical example of using the SEQUENCE function in Excel. This function is particularly helpful when you need to automatically generate a series of numbers, dates, or other patterns without manually typing them. We’ll show you how the SEQUENCE Function in Excel can streamline your workflow with our example data of employee names. Let’s dive in!
What is the SEQUENCE Function in Excel?

The SEQUENCE function in Excel allows users to create a range of sequential numbers, which is extremely handy for filling in numbered lists, setting up dates, or organizing data based on specific criteria. The formula is flexible and can be customized for the number of rows, columns, starting values, and step increments. Here’s the basic syntax:
=SEQUENCE (rows, [columns], [start], [step])
- Rows: The number of rows to fill.
- Columns: The number of columns to fill.
- Start: The starting number (default is 1 if omitted).
- Step: The increment between each number (default is 1 if omitted).
Now, let’s apply this function with a real-world example to give you a better grasp!
Example Data Setup
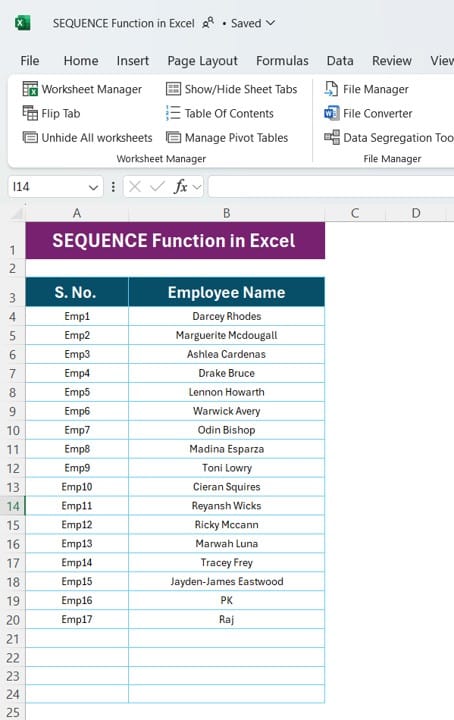
In our example, we have a list of employees, and we’d like to assign sequential employee IDs to each person in the list. The data we’re working with includes two columns:
- This is where we’ll use the SEQUENCE function to generate unique IDs for each employee.
Step-by-Step Guide: Creating a Sequential List of Employee IDs
We want to create a unique identifier for each employee in the format “Emp1,” “Emp2,” and so on. Using the SEQUENCE function will save time and reduce errors compared to manually inputting each ID. Let’s walk through how to set this up in Excel:
Setting Up the SEQUENCE Formula

- Click on cell A3 where you want the sequence to begin.
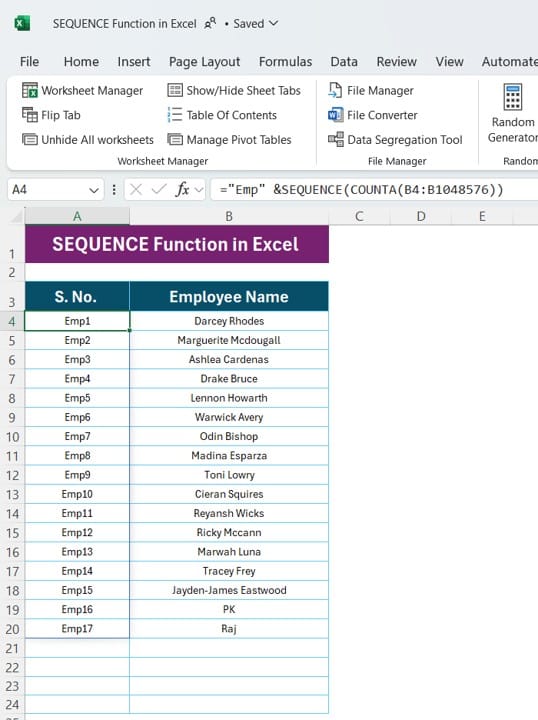
- Enter the following formula to generate the unique IDs for each employee:
=”Emp” & SEQUENCE (COUNTA (B3:B20))
Breaking Down the Formula
- “Emp”: This is a text string added before each sequence number, giving us the “Emp” prefix for each ID.
- SEQUENCE (COUNTA(B3)): The SEQUENCE function takes the count of names in Column B (our list of employees) and generates sequential numbers for each entry. The COUNTA function ensures that we count all non-blank cells in the range, so our sequence matches the number of employees.
You’ll instantly see “Emp1” through “Emp17” in Column A, perfectly paired with each employee’s name in Column B!
Why Use the SEQUENCE Function?
If you’re wondering why SEQUENCE is worth mastering, here are a few key advantages:
- Timesaving: No need to manually enter IDs or numbers, especially useful for large datasets.
- Error Reduction: Minimizes the risk of typos or skipped numbers.
- Dynamic Adjustment: If you add or remove employees from Column B, the SEQUENCE function will update the IDs automatically.
Practical Tips for Using SEQUENCE in Excel
To get the most out of SEQUENCE, here are some best practices:
- Combine with Text: As we did in this example, combining SEQUENCE with text (like “Emp”) can make IDs more informative.
- Use for Dates: SEQUENCE is also great for generating a series of dates by setting the start to a date and the step to 1.
- Apply Formatting: Customize the look of your sequence with conditional formatting, particularly if you’re using it for lists with significant visual data.
Conclusion
The SEQUENCE function is a powerful tool that can make your data management more efficient. In this example, we’ve created unique IDs for a list of employees effortlessly, demonstrating just one of many ways SEQUENCE can streamline your work in Excel.
Try it out on your next project and see how SEQUENCE can enhance your productivity!
Visit our YouTube channel to learn step-by-step video tutorials
View this post on Instagram
Click hare to download the practice file


